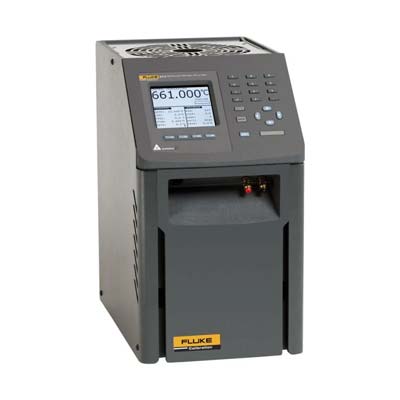
Fluke Calibration 9173 Metrology Well
Display Accuracy
Most dry-wells are calibrated by inserting a calibrated PRT and adjusting internal control sensors. However, this approach has limited value due to:
- Differences between the reference PRT and thermometers being tested
- Thermal gradients in the block
- Inadequate immersion from short blocks
Metrology Wells overcome these issues through:
- Minimized temperature gradients, loading effects, and hysteresis
- Calibration using traceable, accredited PRTs
- Proprietary electronics with repeatable accuracy, exceeding specs by more than 10x
- Display accuracy from ±0.1 °C (typical temps) to ±0.25 °C at 661 °C
An application note is available to better understand the associated uncertainties.
Optional: For improved accuracy, Metrology Wells can be ordered with built-in electronics for external PRT reading using ITS-90 characterizations.
Stability
Fluke heat sources are among the most stable in the world—and Metrology Wells improve upon this legacy:
- Models 9170 / 9171: Stability of ±0.005 °C over the full range
- Model 9173 (700 °C unit): Stability of ±0.03 °C
Only fluid baths or primary fixed-point devices offer better performance. This level of stability cannot be matched by the “off-the-shelf” controllers found in most dry-wells.
Axial Uniformity
According to EA-10/13 guidelines, dry-wells should have a 40 mm zone of maximum homogeneity. Metrology Wells go further with:
- Dual-zone control
- Increased well depth
- Homogeneous zones extending 60 mm (2.36 in)
- Vertical gradients ranging from ±0.02 °C at 0 °C to ±0.4 °C at 700 °C
Specifications for axial uniformity are published and guaranteed for each unit.
Radial Uniformity
Defined as the temperature difference between wells:
- Metrology Wells use a strict definition—largest difference between homogeneous zones of wells ≤6.4 mm (0.25 in) in diameter
- Models 9170 / 9171 (cold units): ±0.01 °C
- Models 9172 / 9173 (hot units): ±0.01 °C to ±0.04 °C at 700 °C
Poorly designed sources or use of large probes can lead to large variations; Metrology Wells prevent this.
Loading Effects
Loading is the temperature shift when all wells are filled versus when only one is. Metrology Wells minimize this through:
- Deep well design
- Dual-zone controls
- Cold units show minimal effects, as low as ±0.005 °C
Hysteresis
Thermal hysteresis arises mostly from internal control sensors rather than high-quality reference PRTs. It reflects the difference in measurements at the same set point approached from different directions.
- More pronounced near midpoints of temperature ranges
- Metrology Wells use better internal components
- Hysteresis effects range from 0.025 °C to 0.07 °C
Immersion Depth
Deep immersion is key to minimizing axial gradient and loading effects. Metrology Wells accommodate sensor-specific factors such as:
- Sensor location and size
- Probe mass and width
- Lead wire configuration
Well depths:
- Models 9171 / 9172 / 9173: 203 mm (8 in)
- Model 9170: 160 mm (6.3 in), enabling performance to –45 °C
User Interface and Software Features
Metrology Wells are simple and intuitive to use, featuring:
- Large LCD display
- Numeric keypad
- On-screen menus in English, French, or Chinese
- Real-time display of block temp, reference temp, cutout temp, stability, and ramp rate
Interfaces and Automation:
- RS-232 serial interface
- Compatible with Model 9930 Interface-it and xModel 9938 MET/TEMP II software
- Supports fully automated calibration of RTDs, thermocouples, and thermistors
Pre-programmed functions (no PC required):
- Up to 8 set points with ramp/soak
- Automated “switch test” to identify thermal switch dead-band
- Dedicated °C/°F switch button
Inserts and Portability
- Choose from six standard inserts supporting both metric and imperial probe diameters
- Units are compact and lightweight—easy to deploy in various environments
Model 9170 Summary
- Temperature range down to –45 °C (in normal conditions)
- Stability: ±0.005 °C
- Immersion depth: 160 mm (6.3 in)
- Axial uniformity: ±0.02 °C
- Radial uniformity: ±0.01 °C
Specifications: Fluke Calibration 9173 Metrology Well
| Specifications | |||
| Range (at 23°C ambient) | 50°C to 700°C1 (122°F to 1292°F) | ||
| Display accuracy | ±0.2°C: 50°C to 425°C ±0.25°C: 425°C to 660°C |
||
| Stability | ±0.005°C: 50°C to 100°C ±0.01°C: 100°C to 425°C ±0.03°C: 425°C to 700°C |
||
| Axial uniformity | ±0.1°C: 50°C to 100°C ±0.25°C: 100°C to 425°C ±0.4°C: 425°C to 700°C |
||
| Radial uniformity | ±0.01°C: 50°C to 100°C ±0.025°C: 100°C to 425°C ±0.04°C: 425°C to 700°C |
||
| Loading effect (with a 6.35 mm reference probe and three 6.35 mm probes) | ±0.02°C at 425°C ±0.04°C at 700°C |
||
| Hysteresis | 0.07°C | ||
| Well depth | 203 mm (8 in) | ||
| Resolution | 0.001°C | ||
| Display | LCD, °C or °F, user-selectable | ||
| Key pad | Ten key with decimal and ± button. Function keys, menu key, and °C / °F key. | ||
| Cooling time | 235 min: 700°C to 50°C 153 min: 700°C to 100°C |
||
| Heating time | 46 min: 50°C to 700°C | ||
| Size (H x W x D) | 366 x 203 x 323 mm (14.4 x 8 x 12.7 in) | ||
| Weight | 15 kg (33 lb) | ||
| Power | 115 V AC (±10%), or 230 V AC (±10%), 50/60 Hz, 1025 W |
||
| Computer interface | RS-232 Interface | ||
| Traceable calibration (NIST) | Data at 100°C, 200°C, 350°C, 500°C, and 660°C | ||
| 1. Calibrated to 660°C; reference thermometer recommended at higher temperatures. | |||
| Specifications | Built-in Reference Input | ||
| Temperature range | –200°C to 962°C (–328°F to 1764°F) | ||
| Resistance range | 0 Ω to 400 Ω, auto-ranging | ||
| Characterizations | ITS-90 subranges 4, 6, 7, 8, 9, 10, and 11 Callendar-Van Dusen (CVD): R0, a, b, d | ||
| Resistance accuracy | 0 Ω to 20 Ω: 0.0005 W 20 Ω to 400 Ω: 25 ppm |
||
| Temperature accuracy (does not include probe uncertainty) |
10 Ω PRTs: ±0.013°C at 0°C ±0.014°C at 155°C ±0.019°C at 425°C ±0.028°C at 700°C |
25 Ω and 100 Ω PRTs: ±0.005°C at –100°C ±0.007°C at 0°C ±0.011°C at 155°C ±0.013°C at 225°C ±0.019°C at 425°C ±0.027°C at 661°C |
|
| Resistance resolution | 0 Ω to 20 Ω: 0.0001 Ω 20 Ω to 400 Ω: 0.001 Ω |
||
| Measurement period | 1 second | ||
| Probe connection | 4-wire with shield, 5-pin DIN connector | ||
| Calibration | NVLAP accredited (built-in reference input only), NIST-traceable calibration provided | ||


Reviews
There are no reviews yet.